Outlook Express Setup Tutorial
Disclaimer & Responsibilities
This Outlook Express Setup Tutorial assumes that you already know how to find Outlook Express on your computer, understand basic Windows operations, and have a working connection to the Internet. The total time to complete the set-up of your first e-mail account is about 10 minutes.
CyberSurfers configures its servers to use industry standard methods for proper and secure delivery and receipt of e-mail. Some Dial-Up, DSL, ISDN, and Cable Internet providers custom configure their networks and may require additional parameters or may have various restrictions and limitations. Although we make every attempt to help our clients configure their e-mail accounts, CyberSurfers is not responsible for the support required to set up your e-mail client settings if your ISP does not use industry standard configurations for Internet connectivity. Additional ISP support is required in about 1 out of 10 e-mail client setups.
If you determine that you have followed the instructions in this tutorial and still are unable to retrieve or send e-mail, please call the support line provided by your ISP to determine what restrictions or limitations they have in place. To resolve an issue where you can receive e-mail but can't send e-mail, and after you have made sure that the checkbox is checked for My Server Requires Authentication (Step 12 of this tutorial) your ISP may ask you to use their Outgoing SMPT servers and a simple change (Outgoing Mail SMTP) in step 7 or step 12 of our tutorial will resolve the issue. Only your ISP can give you the address for Outgoing Mail SMTP if they have restricted outgoing mail to their servers. If your ISP does not offer you the support you deserve for their proprietary configurations, and mention the words Spam, Firewall, Security, Router, Blocking, or non POP & SMTP as reasons for your inability to receive or send e-mail, please feel free to call CyberSurfers and we will direct you to the many ISPs available that use industry standard methods of network configuration and offer outstanding support.
*Note: There may also be limitations due to your personal software configurations on your computer such as AntiVirus, Intrusion Detection, & Security software; however, in our experience, the number one cause of E-mail account issues is related to ISP restrictions and limitations.
Some restrictions or limitations imposed by ISPs or software that you may have on your computer that may affect your e-mail client settings are:
- Spam Filters
- Firewall Configurations
- Security Settings
- Router Settings
- Outgoing Mail Server Blocking
- Proprietary Non POP & SMTP Mail Server Systems
Setting Up Your E-Mail Account
If you do not have the below information handy, please call CyberSurfers and we will provide you with the information that is required to set up your Outlook Express e-mail client.
Total time to complete the set-up of one e-mail account is about 10 minutes.
- Your New E-Mail Address
- Your E-Mail Account User Name
- Your E-Mail Account Pass Word
- Your Incoming Mail Server (POP - Post Office Protocol)
- Your Outgoing Mail Server (SMTP - Simple Mail Transfer Protocol)
- Your Incoming Mail Server Port Number (Port 110)
- Your Outgoing Mail Server Port Number (Port 25)
STEP 1
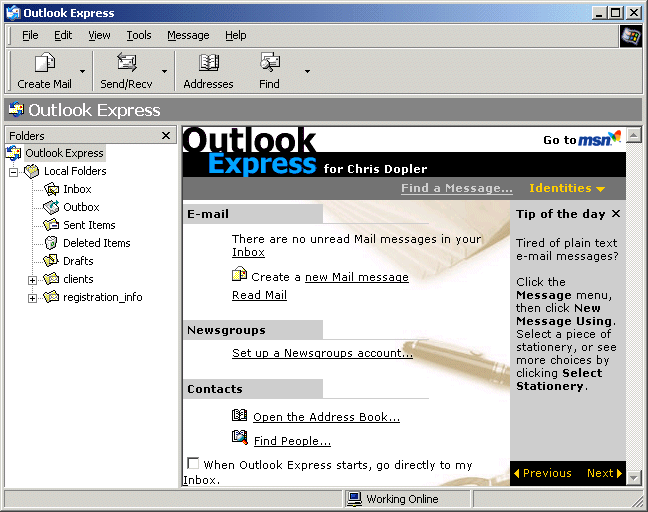
Making sure that you are connected to the Internet, Open Outlook Express. Depending on your personal settings, you should see a screen similar to the screen shot below.
STEP 2
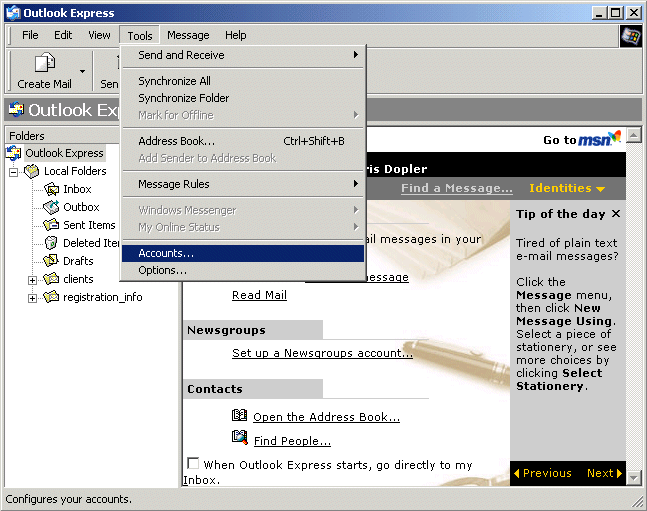
Click on Tools in the Main Menu and then Click on the Accounts sub-menu item.
STEP 3
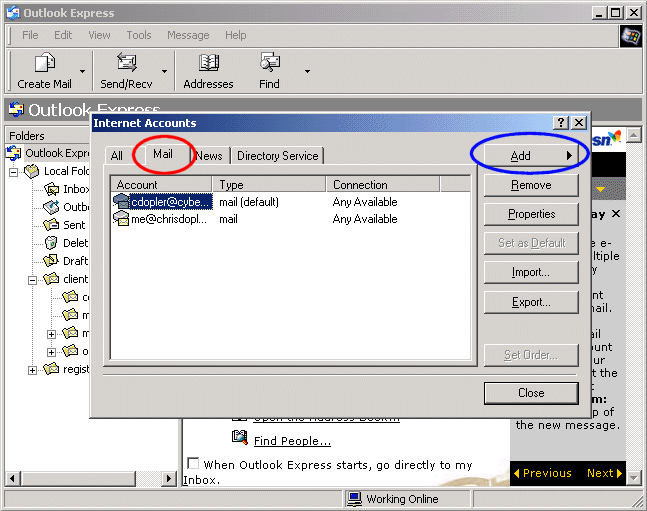
You will now see the Internet Accounts Window appear. Click on the Mail Tab. Depending on your personal settings, you should see a screen similar to the screen shot below. If you already have other e-mail accounts set up, you will see them listed. Next, Click on the Add Button.
STEP 4
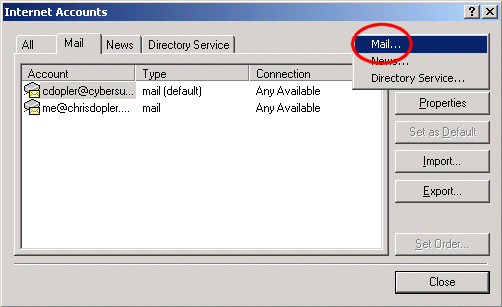
Click the sub menu item Mail as shown in the below screen shot.
STEP 5
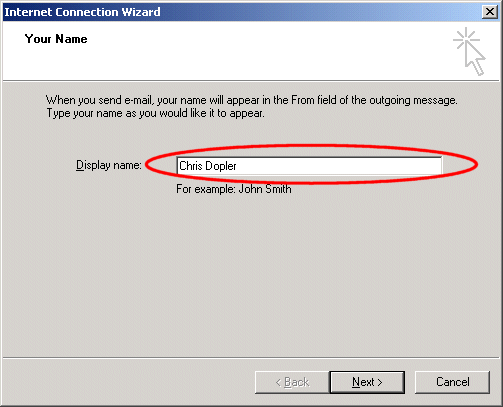
The Internet Connection Wizard window Your Name will appear. Type your Display Name as shown in the below screen shot. (The Display Name will appear in the FROM area of e-mail messages that you send to people.) Click Next.
STEP 6
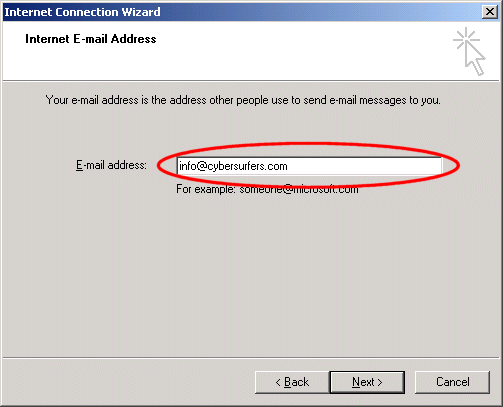
The Internet Connection Wizard window Internet E-mail Address will appear. Type your E-mail address as shown in the below screen shot. (This is your new E-mail address provided by CyberSurfers and usually will contain something like yourname@yourdomain.com) Click Next.
STEP 7
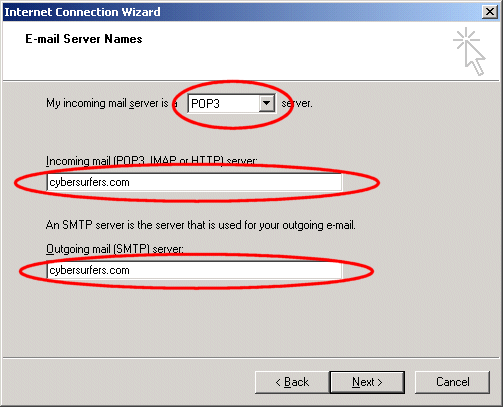
The Internet Connection Wizard window E-mail Server Names will appear. First, make sure that POP3 is selected. Second, Type your Incoming mail server. (This address was provided by CyberSurfers and usually will be yourdomain.com) Third, Type your Outgoing mail server. (This address was provided by CyberSurfers and usually will be yourdomain.com) The screen shot below shows the 3 fields that must be selected or entered. Click Next.
STEP 8
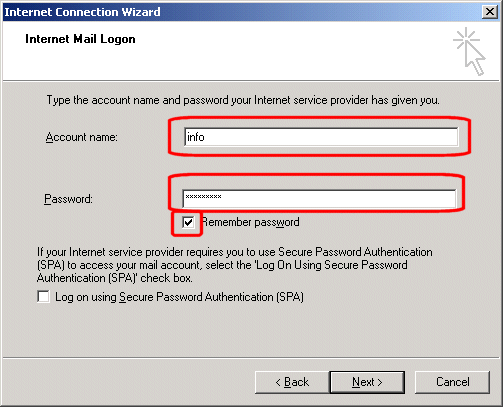
The Internet Connection Wizard window Internet Mail Logon will appear. First Type your Account Name. (The account name was provided by CyberSurfers and is most likely NOT your e-mail address, NOT your business, and NOT your name) Second, Type in your Password. (The password was provided by CyberSurfers and usually will be eight alphanumeric characters for security reasons) Third, Make sure the Remember Password Check box is checked. (Checking the Remember Password check box is optional, however, if it is not checked, you will be required to enter your password every time that you check your e-mail.) The screen shot below shows the 3 fields that must be entered or checked. Click Next.
STEP 9
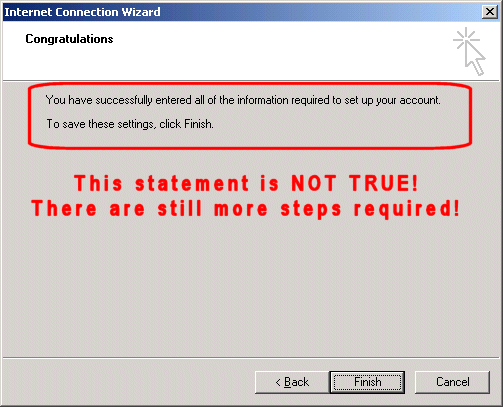
The Internet Connection Wizard window Congratulations will appear. This is NOT TRUE! (Unless you wish to allow and aid overseas pornography companies, scam artists, and various other individuals to engage in illegal activities using your e-mail account, there is one more important step.) Click the Finish button to go to Step 10.
STEP 10
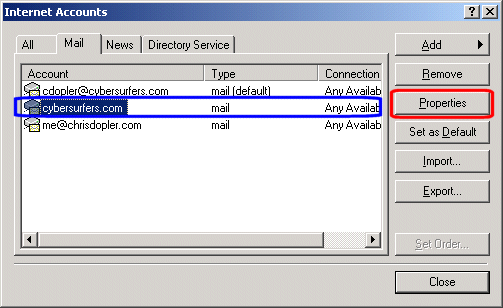
You will now see the Internet Accounts Window appear again. Note that your newly created e-mail account is listed. Make sure the account is highlighted. (Note that the Account is most likely your domain name. This is fine if you only have one e-mail account with the same domain name; however, if you have more than one account, it will become very confusing as to which e-mail account is which. We will fix this overlooked issue now and take care of the security issue mentioned in step 9.) Click the Properties button as shown in the below screen shot.
STEP 11
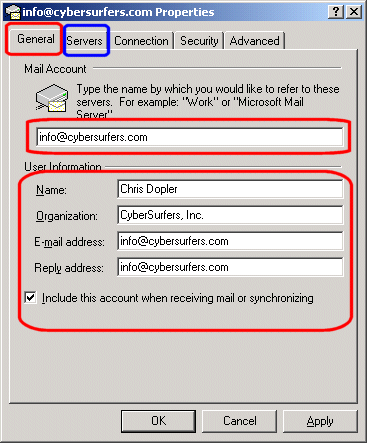
You will now see the Properties Window appear. First, to eliminate future confusion, change the Mail Account text box to your newly created e-mail address. (This is your new E-mail address provided by CyberSurfers and usually will contain something like yourname@yourdomain.com) Second, in the User Information Section, Type in your Name, Organization, E-Mail Address, (This is your new E-mail address provided by CyberSurfers and usually will contain something like yourname@yourdomain.com), and Reply address (This is also your new E-mail address provided by CyberSurfers and usually will contain something like yourname@yourdomain.com - This will allow the people for which you have sent an e-mail to easily reply back to you.) Make sure that the Include this account when receiving mail or synchronizing check box is checked. Then Click the Servers Tab as shown in blue in the below screen shot.
STEP 12
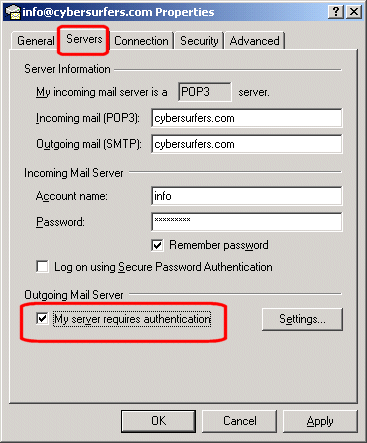
THIS STEP IS CRUTIAL TO MAINTAIN SECURITY!
You will now see a window similar to the screen shot below. In the Outgoing Mail Server Section, Make sure that the checkbox is checked for My Server Requires Authentication. Next, Click the Advanced Tab.
STEP 13
You will now see a window similar to the screen shot below. First, under the Server Port Numbers section, Make sure that the Outgoing mail (SMTP) field is 25. Second, Make sure the Incoming mail (POP) field is 110. Third is an optional but highly suggested step. (This step will allow you to check your e-mail from multiple computers at multiple locations ie. at home and at the office. By default, when you check your e-mail, it is removed from the server. There is at least one disadvantage to the default setting. You will be unable to maintain a copy of all e-mail messages on each computer if you are checking your e-mail from more than one computer.) If you wish to maintain a copy of all e-mail messages on each computer if you are checking your e-mail from more than one computer, Check the check box next to leave copy of mail on server, then check the check box next to Remove from server after and finally Adjust the day(s) number to about 14. (The number of days that you determine is how many days after you check your e-mail from at least one computer that messages will be on the server to check from another computer. If you do not check your e-mail from any computer, your e-mail will not be deleted. Only if you have checked your e-mail from at least one computer will the e-mail be deleted after the specified number of days. If you are on a two-week vacation and are checking your e-mail from a laptop or another computer, make sure you have configured at least 14 days or when you get back to the office or home, the e-mails will have been deleted from the server and no longer available for download onto your other computers.)
IMPORTANT NOTE
Do not be tempted to put too high of a number for the remove after option (more than 15 days) because your e-mail data storage requirements may end up being more than your hosting package allows. Your data storage is limited by the amount of disk space that your hosting package offers. If your hosting package has a storage cap (standard hosting), once your box is full, people will no longer be able to send you e-mail. If you have requested a package with no storage cap (custom hosting packages), then you will be charged the contracted monthly storage fees associated with your storage.
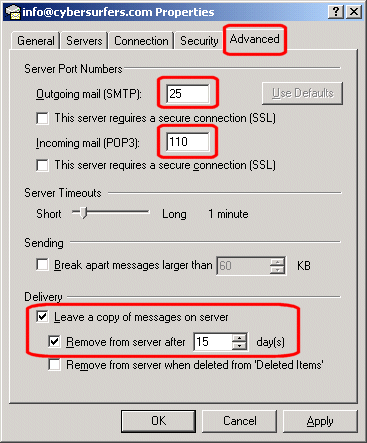
Click on the OK button
STEP 14
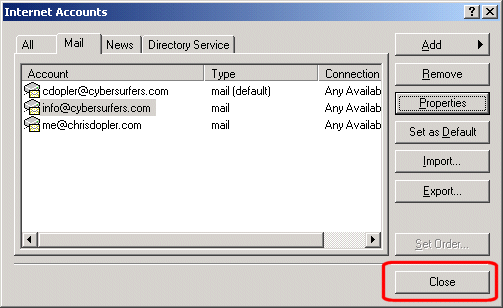
You will now see the Internet Accounts Window appear again. Note that your newly created e-mail account is listed, but this time is your e-mail address. This makes keeping track of future accounts less confusing. Click the Close button as shown in the screen shot below.
You are now finished setting up your new e-mail account and are ready to start sending and receiving e-mail from your domain name.